Showing posts with label tutorial. Show all posts

Tuesday, October 2, 2012

Tutorial: Make a Nature Themed Sensory Box

I am a big fan of sensory tables for kids but they can be very costly to buy/build. Claire's Nana does have plans for one her, but to tide us over until it is ready I made us a makeshift one in a matter of minutes...and you can to!
A sensory table is an activity centre that encourages child led play and exploration, stimulating a child's keen senses. Being that it is fall I thought I would make a nature inspired one with different shapes and textures. The first thing I did was find a long rectangular box and reinforce it with some packing tape.
Then I went through my tupperwear cupboard to find some interesting shaped containers that were missing lids, instant containers for different nature finds! I traced the bottom of these on the top of the box. Because tupperwear has a lip to it for the lid to snap on to they were perfect for whats coming next....
Next I cut out the shapes I had traced making perfectly sized holes that I could slide the containers into so that Claire could reach inside the sensory box to discover items. Before I inserted them, I painted the box black, it could be any color you want though! Once the paint had dried I slid the containers in and filled them with little bits of nature that Claire and I found on a recent trip to the beach.
Pine cones, drift wood and big (non-choke size) rocks in all sorts of shapes and colors. A West Coast themed sensory box that took me 20 minutes and no money to make!


Tuesday, August 21, 2012

Learning About Sage: Part Two

If you read part one you will know I plan on cleansing my new house with sage, and a few other little tricks and treats I have up my sleeve. In part one I gathered my herbs (sage and lavender) and lay them out in the sun to dry and be blessed by the suns warm rays. Today we are going to make a smudge stick! I know, I know, so exciting: you must be jumping up and down and clapping your hands! No? That's just me? Well anyways...

The first step is to gather your herbs in a bundle and trim the ends to an even length.

 Gather them in a way that is easy to hold in one hand, as the other will be doing the wrapping. Wind some thread around the base, do quite a few rounds to get it all nice and secure.


Once you have a strong starting point you are going to wind the thread from BOTTOM to TOP like this:


When you get to the top turn around and do the same thing back down to the base, like this. You can do this step as many times as you want, in order to get the desired look you want. My first attempt was a little loose looking so I plan on doing a few more wraps of thread, it will burn better if it is nice and tight. Here is how it currently looks


Now you lay it out to dry for 4-5 days (I will wrap mine a bit more first), as you wait for Part Two where we learn how to use a smudge stick!


Many blessings,

Kami

Learning About Sage: Part One

Some of you know that I am in the process of moving into our first HOUSE! Very exciting (albeit stressful) times for this little family of three. Our current home is lovely, but sadly we have outgrown it and need more room for Claire to run and play. Neither Ryan nor I have lived in a house of our own before, so this is very exciting! A big step up from basement suites and apartment rentals. This move symbolizes a lot for me: a fresh start. It reminds me of when we picked up all of our pieces and moved halfway across the country to a city I had never even been too, Toronto. That was the scariest decision we ever made as a couple and it turned out to be one of the best. I am hoping this step will be the same.

I am however a much more spiritualy inclined person then I was back then, and I want to start of on the right foot. Our first month in Toronto was pure and utter HELL, we were really put through a lot of tests and trials. To help ease this transition for the sake of my sanity (which at times is questionable) and Claire's happiness I have decided to 'bless' our new house by doing a smudge ceremony.

For those of you that don't know, smudge is basically a bundle of sage, tied together, dried, and then lit on fire to a slow smoulder. Its sweet smelling smoke is used by First Nations people to cleanse away negativity and evil spirits: be it a persons body or a sacred space. I'm not really one to follow anyting to strictly, I kind of like to do things my own way so I have made up a Kamika version to meet my needs.

The first step in this process is to gather herbs from my garden, of course sage, but I have also decided to use some lavender for its peaceful and calming affect. Theses herbs are currently laying out in the sun getting all nice and warm and blessed by the suns rays before I bundle them into a smudge stick.


I will post a little tutorial on how to make your own one soon

Many blessings,

Kami

Thursday, March 22, 2012

How to Make Your Own Oat Milk

Have you ever tried Oat Milk? It is d-lish, especially warm with a pinch of cinnamon. I made some for Claire to try in her sippy cup and I thought I would share the process with you all!

First off gather your supplies. You will need oats, water, a pinch of salt, a blender, strainer, and something to store liquid


Grind your oats in the blender. This will speed up the soaking process. Add two cups of oats to your container and add 5 cups of water, with the pinch of salt. Give it a shake and let this soak in the fridge over night.


Now that your oats have soaked strain your oats through a strainer into a large bowl, or another storage container. Smoosh the soft oats through the strainer getting out every last bit of milk. You can also use a cheesecloth which will be easier and faster, sadly I didn't have one.


That's it that's all! Discard the mushy oats and enjoy your oat milk. Store it in the fridge for up to 7 days. Try it warm with a pinch of cinnamon before bed. YUM. Dairy free and d-lish!


Click To Vote For Us @ the Top Baby Blogs Directory! The most popular baby blogs

Friday, January 13, 2012

Not Your Mamma's Meatloaf


Meatloaf doesn't have to be bland! Spice it up with this tasty recipe. The chorizo adds some heat and the molasses keeps the spice under control
  • 1 pounds ground beef
  • 4 chorizo sausages (casing removed)
  • 1 egg
  • 1 onion, chopped
  • 4 cloves of garlic diced
  • 1 cup skim milk
  • 1 cup dried bread crumbs
  • salt and pepper to taste
  • 2 tablespoons brown sugar
  • 1 tablespoon blackstrap molasses
  • 2 tablespoons dijon mustard
  • 1/3 cup ketchup
  1. First things first, preheat your oven to 350 degrees F (175 degrees C).
  2.  See all of those ingrediants above? Yup all of them, go ahead toss them in a bowl and SQUISH! You heard me right, just mush it all together with your hands. As long as the meassurements are right you cant mess up this one
  3. Fill a lightly greased bread pan (loaf pan) with your awesome squishy meat mix
  4. Bake at 350 degrees F (175 degrees C) for 1 hour. 
  5. NOM NOM NOM
Click To Vote For Us @ the Top Baby Blogs Directory! The most popular baby blogs

Thursday, December 29, 2011

Tutorial: Shabby Chic New Years Wreath


Just because Christmas is over doesn't mean you cant still have some holiday crafts decorating the house (but if you are like me your tree is up until New Years day!). Rather then hang a Christmas wreath this year I decided to make a general "holiday" one, something that I could leave up through the winter. So I crafted my very own New Years Wreath, and here is how I did it:

Step One: Buy/Find an old Christmas Wreath

I found this tacky one for $2 at a local thrift store. It has a wicker frame, perfect for deconstructing!

Step Two: Take of the decorations until you are left with a bare wreath


I loved the country chique simplicity of this plain wicker frame

Step Three: Salvage some of the decorations to use elements you did like

The original wreathe was quite tacky, but I did like the gold berries and jingle bells. So I kept them and added a few on. When contrasted against the plain wwicker wreath it gave a simple elegance. The hold decorations had wire already attached to them so I just twisted it through the branches. You could add your own crafting wire easily.

Step Four: Wrap some fabric around your wreath


You could wrap the whole wreath in fabric if you wish, but I liked the asymmetrical look of this. I used an old blouse that doesnt fit across my mega-boobie-juice-jugs anymore.  You can see I added on a couple more jingle bells here too. A small dab of hot glue at the beginning of your fabric wrapping will hold it in place as you wind, and then one last bit of hot glue at the end to secure it. I just used the wire in the bells to tuck it into the fabric folds.

And TA DA! You have a simple, shabby-chique holiday wreath that you can leave up all winter long. Enjoy!


Click To Vote For Us @ the Top Baby Blogs Directory! The most popular baby blogs

Tuesday, November 1, 2011

Easy Peasy Apple Crumble!

I recently made an Apple Crumble for my family, and it was a huge hit! It was so easy to make that I thought I would share the recipe with you all...frankly I don't know why I don't make this every night! It was that easy!

First things first...gather yourself some delicious apples! I recommend granny smith as they stand up to baking really well and their tartness adds a nice touch to a sweet dish. I didn't have quite enough so I tossed in a red apple here as you can see. Well you are at it, pour yourself a glass of wine! I did, an essential part of the procedure I think....


Slice up those apples! I leave the skins on personally for the goodness in them, but you could peel them if you like....but this is an "easy peasy" recipe! So I say leave 'em! I recommend cutting them a bit thicker then I did so that they have some density to them after baking, kind of how you would for an apple pie. Some of mine where just a bit too thin and mushy for my liking.


Once your apples are sliced, fill a square, greased, baking dish with them. Now, in a bowl mix together the following: 1/2 cup of quick cooking oats, 1/2 a cup of flower, 1/2 cup brown sugar, 1 tsp cinnamon and 1 tsp nutmeg and 1/3 cup of melted butter. Just toss it all in there! No need to be pretty or perfect here because all you are going to do is mush it together! Go ahead! MUSH! Stir it all up and this will be your crumble!


Spread the crumble mixture on top of your sliced apples and bake in the oven at 350 for 30-45 minutes, or until your crumble is golden brown. Allow it to cool a bit and add a scoop of vanilla ice cream on top....YUM! But uhm....if you plan to blog about it remember to take a picture before its all gone! We ate the whole damn thing before I realized that. THAT'S HOW GOOD IT WAS! LOL

Tuesday, July 5, 2011

Tutorial: Chicken Wire Display Frame


Hey! It's me Dallas from Sew Indy!! I would like to thank Kami for allowing me this awesome opportunity to guest post on her blog today. I'm going to show you how to turn an otherwise drab and boring picture frame into a display for your crafts, pictures, hair accessories, or jewelry the possibilities are endless.
Materials:


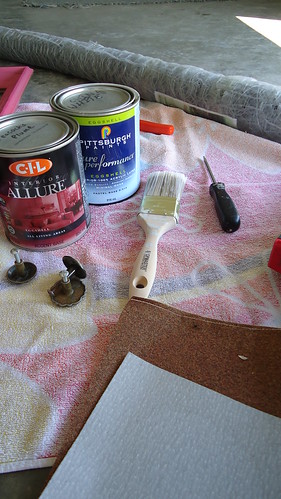
For this project you will need:
-Picture Frames-Paint-Paint Brushes-Sand Paper {if necessary, I didn't need any it just depends on the material your frames are made of, mine were wood}-Chicken Wire-Wire Cutters-Heavy Duty Staple Gun


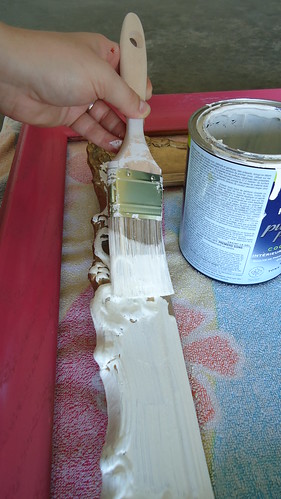
First things first slap a coat of paint on to your picture frames, or two if needed. Make sure you get the sides and back to if you plan on hanging it on your wall you don't want any unpainted spots showing :)


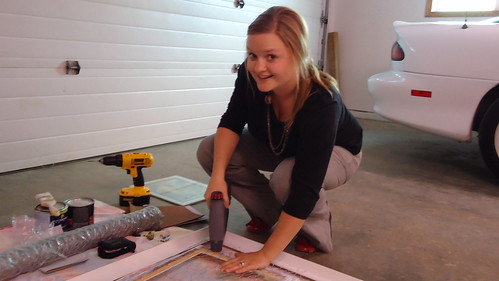
While your paint is drying you can cut your chicken wire. Your measurements don't need to be precise as you can trim the chicken wire once it has been stapled to the frame.
*Please note chicken wire is harder to cut than it seems lol {It's actually not I just wanted a funny pic}tee hee


Once your paint is nice and dry you can flip your picture frame over and start stapling! This was the fun part my in-laws had an electric staple gun ooooh yeah! power tools baby! I find it works best if you staple one side and then pull the wire taught and staple the other side.


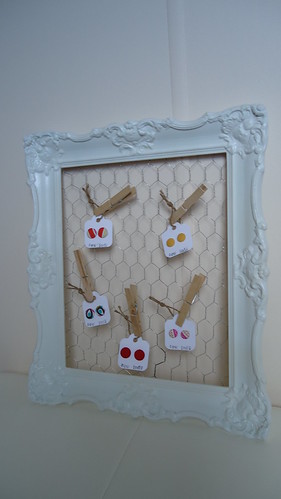
Viola you now have a beautiful, up-cycled display frame!! You can also paint your frame one color and your chicken wire another {which I might do this white business is a little plain for this girl} HA! Hope you enjoyed this tutorial, I know I did! Stop by Sew Indy and say hi!


PS: Don't forget to click here to vote for my blog on Top Baby Blogs! No sign up needed, just a simple click to vote! Thank you so very much xoxoxo
Click To Vote For Us @ Top Baby Blogs Directory!

Tuesday, May 31, 2011

Tutorial: Make a Prayer Flag Inspired Bunting!


Hi my name is Jo and I blog over on My Pangaloon! I'm here today to teach you a quick craft activity, that you can seriously whip up in about 10-15mins.

If you are having friends around this summer, or your fancy a picnic out, why not add make some quick prayer flag inspired bunting. It will add a homely and vintage feel to any occasion.

You will need a selection of scraps. I used three different patterns and cut them very roughly into simliar sized rectangles. You need not be precise, as I think It looks better anyway, if they are not perfect.


1. Cut out your rectangles. I ended up with 20

2. Now for the binding. I wanted a quick raw edge, so measured about 1inch, snipped the tip of the fabric, then tore the rest by hand.

3. Sew you binding directly over the top of the flag ( I left a little exposed, just because I liked the look). I used a zigzag stitch

4. Hang, and bask in how clever you are. This is a great activity for a child who is just learning how to use a sewing machine. My eldest    is 5 and she can just about cope with this activity ( supervised of course)


Have fun and let me know how you get on!
http://mypangaloon.blogspot.com/


PS: Don't forget to click here to vote for my blog on Top Baby Blogs! No sign up needed, just a simple click to vote! Thank you so very much xoxoxo
Click To Vote For Us @ Top Baby Blogs Directory!

Friday, May 27, 2011

Tutorial: Sew Your Own Lace Shirt


Hello everyone! I'm Kenzie from Strokes of Serendipity and I'm so happy to be a sponsor on Kami's blog this month! I have a really easy and quick DIY for you and I hope you all love it! 


You will need: 
- about one yard of fabric - I used lace for a breezy summer shirt. 
- scissors
- needle and thread or a sewing machine

Take your fabric and fold it in half so that the fold is on the top. 

Now take your fabric and fold again from left to right. The original fold should still be on top with another on the left. 


Cut the corner off where both folds meet. This will be your neck hole. You may want to make it large or small depending on the look you want. 


Unfold your fabric once so that it is still folded on the top. Now you're going to sew the sides leaving room for arm holes. I started sewing about 8 inches from the fold on top towards the open edge on the bottom.

It can be tighter or looser depending on the look you like. Just make sure that if you make it tighter, that the fabric is a little bit stretchy. I made mine pretty loose. 


And you're done! Easy right? 


I hope you enjoyed this super quick DIY! And feel free to stop by my blog to say hi!
♥ Kenzie


PS: Don't forget to click here to vote for my blog on Top Baby Blogs! No sign up needed, just a simple click to vote! Thank you so very much xoxoxo
Click To Vote For Us @ Top Baby Blogs Directory!